As I was making the (pink ribbon) project bag for the contest prize, I decided the bag would also make a cute gift bag. Unfortunately, Christmas is NOT that far away! EEK! Time to get crafting!
Funny thing is, EVERY year I tell myself....."I'll start crafting in JANUARY this year". It does happen. Until about March. Then, I get distracted by other things and don't seem to get much done again until September. Then, it's a mad dash to get things completed before Christmas!
These sew up pretty quick and once you have made a few, you'll be able to vary the sizing easily. I'm going to start you out with the measurements to complete the larger (red) bag in the photo above. It's also the same size I used for the pink ribbons bag.
Lined Gift Bag-
Finished Measurements:
10" wide x 12" long
Yardage Requirements:
Main fabric - 1/2 yd. (if using a one-way print, you may need more)
Lining fabric - 1/2 yd.
2 yards cording
matching thread
Cutting:
from Main fabric - 1 piece 29"x12" If using a one-way print-cut 2 pieces 14-3/4" x 12" see photos below for *If using a one-way print.
from Lining fabric - 1 piece 31"x12" note: lining fabric is 2" longer than main fabric- this results in the 1/2" edge of lining fabric above the main fabric. To eliminate this edge - cut lining fabric the same size as Main fabric.
To begin - cut one rectangle (measurements above) of each main and lining fabrics.
Fold fabric (with right sides together) bringing short edges (12") together.
*If using a one-way print - you will need to put a narrow seam in the bottom. That way you can have the pattern run the same way on the bag. Always make sure the top of the one-way print is at the top edge and the bottom at the seam edge. See photos below.
Sew a 5/8" seam from top edge to fold on long sides of main fabric. Repeat for lining, leaving a 4" to 6" opening in the center of one side for turning bag later.
Press seams open.
At the bottom edge of both the main fabric and lining fabric, fold the seam to the center, creating a triangle (gusset).
Place point of triangle at 2-1/2". Mark seamline and pin.
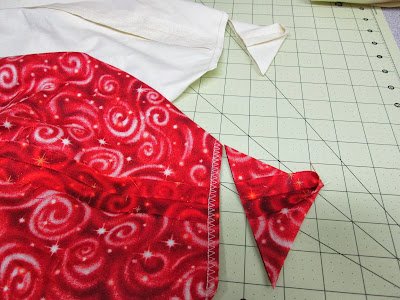
Sew (or overcast) seam. Trim 1/4" away from stitching (or close to overcast stitching). Repeat for other side of bag.
Turn main fabric bag right sides out. Push out all four corners of the bag bottom. Leave Lining fabric as is for now.
Place main fabric bag inside lining fabric (right sides together). Line up seams. Pin.
Sew a 1/4" seam. Turn entire bag right side out through opening in lining.
Now is when I sew the lining opening closed. You could do it at the end if you like, I just find it easier to have it closed now. You can slip stitch this closed if you prefer, but I just edgestitch it closed. It's just the lining. I think you could make this bag reversible (just a note - I haven't tried it yet). If this were the case, I'd definitely slip stitch the opening closed.
Now just push the lining into the main fabric bag. If you cut lining to have the 1/2" edge, it will extend beyond the main fabric. Press edge.
I sew 1-1/2" from the edge for my first stitching line. If you don't want quite that much ruffle, determine how much edge you want to extend above your casing and make that your first stitching line. Your second stitching line will be at least 1/2" below your first stitching line. Remember to allow plenty of room for your cording to run through the casing. You may want more than 1/2" if your cording is thicker.
Now, I know what you're thinking.....How do I get the cording in the casing? We didn't leave an opening! That's right! We're going to create our opening right where we need it. Just grab your seam ripper and CAREFULLY remove the side seam stitches between your casing stitches.
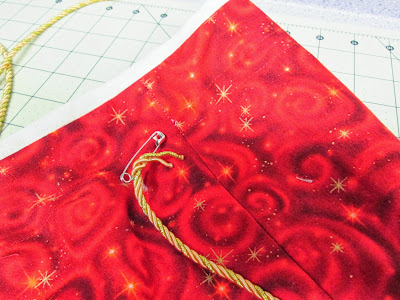
Using a safety pin, thread 1st piece of cording through one side seam opening. Thread all the way around bag top and out the same opening. Repeat for other side opening.
Do you notice how this photo is so much yellower than the others? Not sure why as all the photos were taken at the same time. Frustrating.
Bring end of cording together making pieces equal. Tie end together in knots. Shorten as desired.
Pull ends of cording to draw up bag. That's it! Pretty easy, right? Now you're ready to fill it with.....
- a bottle of wine
- spa-type soaps/scrubs
- yarn and knitting/crocheting supplies
- baked goods
- specialty packets of tea, hot chocolate or coffee
- small toys
Happy Sewing!


What a beautiful bag and a great tutorial!! Thank you for linking up this week at Sewlicious Home Decor! :)
ReplyDeleteMarti
Cute bags! I really like the pink ribbons bag.
ReplyDeleteNavy Wifey Peters @ Submarine Sunday Link Party
Congratulations! You've been featured this week! Thank you for participating at Sewlicious Home Decor....http://sewlicioushomedecor.com/saturday-show-licious-home-decor-53/. :)
ReplyDeleteMarti